HAProxy is a free, very fast and reliable solution offering high availability, load balancing, and proxying for TCP and HTTP-based applications. It is particularly suited for very high traffic web sites and powers quite a number of the world’s most visited ones. Over the years it has become the de-facto standard opensource load balancer, is now shipped with most mainstream Linux distributions, and is often deployed by default in cloud platforms.
First Create 3 Nodes of Centminmod Installation
Node1:192.168.1.1 (CMM Installed) (MariaDB Cluster 1)
Node2:192.168.1.2 (CMM Installed) (MariaDB Cluster 2)
Node3:192.168.1.3 (CMM Installed) (MariaDB Cluster 3)
Node4:192.168.1.4 (CMM Installed) (Haproxy)
Open These ports 4567,4568,4444,3306 under TCP in your firewall (CSF or IPTABLES) on All MariaDB Cluster nodes.
On 192.168.1.1 (CMM Installed) (MariaDB Cluster 1)
Edit my.cnf file and at the end add lines below
Must change
Replace wsrep_node_address=”192.168.1.1″ with your node1 IP address.
Replace wsrep_cluster_address=gcomm://192.168.1.1,192.168.1.2,192.168.1.3 with your node1,node2,node3 IP respectively.
Alternatively you can also
Replace wsrep_cluster_name=”bullten” as you want but do remember it should be same on all nodes.
Replace wsrep_node_name=”node1″ to any name you want.
vi /etc/my.cnf [galera]
# Mandatory settings
wsrep_on=ON
wsrep_cluster_name="bullten"
wsrep_node_name="node1"
wsrep_node_address="192.168.1.1"
#wsrep_provider_options='pc.recovery=ON'
wsrep_provider=/usr/lib64/galera/libgalera_smm.so
wsrep_cluster_address=gcomm://192.168.1.1,192.168.1.2,192.168.1.3
binlog_format=row
innodb_autoinc_lock_mode=2 Stop MariaDB
systemctl stop mariadbStart Galera Cluster
galera_new_clusterChange the permission
chown -R mysql:mysql /var/lib/mysqlOn 192.168.1.2 (CMM Installed) (MariaDB Cluster 2)
Edit my.cnf file and at the end add lines below
Must change
Replace wsrep_node_address=”192.168.1.2″ with your node2 IP address.
Replace wsrep_cluster_address=gcomm://192.168.1.1,192.168.1.2,192.168.1.3 with your node1,node2,node3 IP respectively.
Alternatively you can also
Replace wsrep_node_name=”node2″ to any name you want.
vi /etc/my.cnf [galera]
# Mandatory settings
wsrep_on=ON
wsrep_cluster_name="bullten"
wsrep_node_name="node2"
wsrep_node_address="192.168.1.2"
#wsrep_provider_options='pc.recovery=ON'
wsrep_provider=/usr/lib64/galera/libgalera_smm.so
wsrep_cluster_address=gcomm://192.168.1.1,192.168.1.2,192.168.1.3
binlog_format=row
innodb_autoinc_lock_mode=2Change the permission
chown -R mysql:mysql /var/lib/mysqlStop MariaDB
systemctl stop mariadbStart MariaDB
systemctl start mariadbOn 192.168.1.3 (CMM Installed) (MariaDB Cluster 3)
Edit my.cnf file and at the end add lines below
Must change
Replace wsrep_node_address=”192.168.1.3″ with your node3 IP address.
Replace wsrep_cluster_address=gcomm://192.168.1.1,192.168.1.2,192.168.1.3 with your node1,node2,node3 IP respectively.
Alternatively you can also
Replace wsrep_node_name=”node3″ to any name you want.
vi /etc/my.cnf[galera]
# Mandatory settings
wsrep_on=ON
wsrep_cluster_name="bullten"
wsrep_node_name="node3"
wsrep_node_address="192.168.1.3"
#wsrep_provider_options='pc.recovery=ON'
wsrep_provider=/usr/lib64/galera/libgalera_smm.so
wsrep_cluster_address=gcomm://192.168.1.1,192.168.1.2,192.168.1.3
binlog_format=row
innodb_autoinc_lock_mode=2 Change the permission
chown -R mysql:mysql /var/lib/mysqlStop MariaDB
systemctl stop mariadbStart MariaDB
systemctl start mariadbNow your Node is connected to check cluster size run the below command on any MariaDB node
SHOW GLOBAL STATUS LIKE 'wsrep_cluster_size';
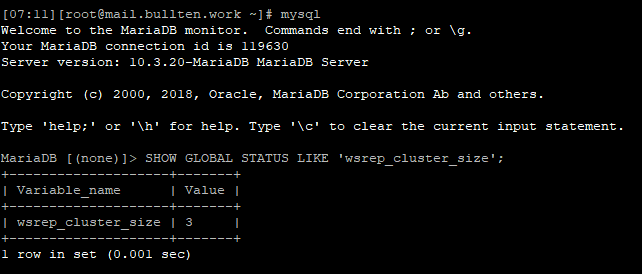
wsrep_cluster_size = 3 shows three nodes are inter connected.
Node4:192.168.1.4 (CMM Installed) (Haproxy)
Install Haproxy
 wget http://www.haproxy.org/download/2.1/src/haproxy-2.1.1.tar.gz
 tar zxvf haproxy-2.1.1.tar.gz
 cd haproxy-2.1.1
 yum install -y make gcc perl pcre-devel zlib-devel openssl_devel systemd-devel
 make \
 TARGET=linux-glibc USE_LINUX_TPROXY=1 USE_ZLIB=1 USE_REGPARM=1 USE_PCRE=1 USE_PCRE_JIT=1 \
 USE_OPENSSL=1 USE_SYSTEMD=1 SSL_INC=/usr/include SSL_LIB=/usr/lib ADDLIB=-ldl \
 CFLAGS="-O2 -g -fno-strict-aliasing -DTCP_USER_TIMEOUT=18"
 make install
 cp /usr/local/sbin/haproxy /usr/sbin/haproxy
 useradd --system haproxy
 mkdir /etc/haproxy
 cd /etc/haproxy
Create Haproxy Service
vi /usr/lib/systemd/system/haproxy.service[Unit]
Description=HAProxy Load Balancer
After=network.target
[Service]
Environment="CONFIG=/etc/haproxy/haproxy.cfg" "PIDFILE=/run/haproxy.pid"
ExecStartPre=/usr/sbin/haproxy -f $CONFIG -c -q
ExecStart=/usr/sbin/haproxy -Ws -f $CONFIG -p $PIDFILE
ExecReload=/usr/sbin/haproxy -f $CONFIG -c -q
ExecReload=/bin/kill -USR2 $MAINPID
KillMode=mixed
Restart=always
SuccessExitStatus=143
Type=notify
[Install]
WantedBy=multi-user.target
Reload systemd Deamon
systemctl daemon-reload
Create haproxy.cfg file and replace 192.168.1.1,192.168.1.2,192.168.1.3 with your respected ip’s
 global
 log 127.0.0.1 local0
 log 127.0.0.1 local1 notice
 maxconn 1024
 user haproxy
 group haproxy
 daemon

 defaults
 log global
 mode http
 option tcplog
 option dontlognull
 retries 3
 option redispatch
 maxconn 1024
 timeout connect 5000ms
 timeout client 50000ms
 timeout server 50000ms

 listen mariadb_cluster_writes
 bind *:13304
 ## A failover pool for writes to ensure writes only hit one node at a time.
 mode tcp
 option httpchk
 server galera-node01 192.168.1.1:3306 check port 9200
 server galera-node02 192.168.1.2:3306 check port 9200 backup
 server galera-node03 192.168.1.3:3306 check port 9200 backup

 listen mariadb_cluster_reads
 bind *:13305
 ## A load-balanced pool for reads to utilize all nodes for reads.
 mode tcp
 balance leastconn
 option httpchk
 server galera-node01 192.168.1.1:3306 check port 9200
 server galera-node02 192.168.1.2:3306 check port 9200
 server galera-node03 192.168.1.3:3306 check port 9200

 listen stats
 ## HAProxy stats web gui.
 bind :9000
 mode http
 stats enable
 stats uri /haproxy_stats
 stats realm HAProxy Statistics
 stats auth haproxy:haproxy
 stats admin if TRUE
Start and enable Haproxy
systemctl start haproxy
systemctl enable haproxy
Install Percona-clustercheck on all MariaDB node(node1,node2,node3).
 git clone olafz/percona-clustercheck
 cd percona-clustercheck
 mv clustercheck /usr/bin/
 cd systemd
 mv * /usr/lib/systemd/system
Start and enable Mysqlchk
systemctl enable mysqlchk.socket
systemctl start mysqlchk.socket
Now there is script error for MYSQL_USERNAME and MYSQL_PASSWORD that needs to be fixed for correct functioning.
vi /usr/bin/clustercheckFind the below lines and change it to look like same below.
MYSQL_USERNAME="${MYSQL_USERNAME:-clustercheckuser}"
MYSQL_PASSWORD="${MYSQL_PASSWORD:-clustercheckpassword!}"
Grant Access to any one node and it will be copied to all
GRANT PROCESS ON *.* TO 'clustercheckuser'@'localhost' IDENTIFIED BY 'clustercheckpassword!'; Now run clustercheck and you will see output as below. Try to run and check on all 3 nodes

Open TCP port 9200 on all MariaDB nodes so that haproxy can interact with it
Now We allow haproxy IP to interact with MariaDB cluster.
On Main MariadDB Node run the below command. 192.168.1.4 is haproxy host IP. You can change haproxy_user and haproxy_pass as you want.
GRANT ALL ON *.* to haproxy_user@'192.168.1.4' IDENTIFIED BY 'haproxy_pass';Now lets test if haproxy is working on port 13305 and changing host on request
on Haproxy node run the below command multiple times to see if value changes every time
mysql -u haproxy_user -phaproxy_pass -h 192.168.1.4 -P 13305 -e "SELECT @@hostname"![[IMG]](https://linuxglobe.com/wp-content/uploads/2019/12/haproxy_check.png)
Haproxy Stats Access
http://192.68.1.4:9000/haproxy_stats
User:Pass: haproxy:haproxy
Now you can install wordpress on a new vps and for MySQL host just use 192.168.1.4:13305 (Change ip as per your haproxy node IP) and it will use haproxy as load balancer. You can stop MariaDB on any node and check if site is working.