
What is LVM
LVM stands for Logical Volume Management. It is a system of managing logical volumes, or filesystems, that is much more advanced and flexible than the traditional method of partitioning a disk into one or more segments and formatting that partition with a filesystem.
Why use LVM?
For a long time I wondered why anyone would want to use LVM when you can use gparted to resize and move partitions just fine. The answer is that lvm can do these things better, and some nifty new things that you just can’t do otherwise. I will explain several tasks that lvm can do and why it does so better than other tools, then how to do them. First you should understand the basics of lvm.
The Basics
There are 3 concepts that LVM manages:
- Volume Groups
- Physical Volumes
- Logical Volumes
A Volume Group is a named collection of physical and logical volumes. Typical systems only need one Volume Group to contain all of the physical and logical volumes on the system, and I like to name mine after the name of the machine. Physical Volumes correspond to disks; they are block devices that provide the space to store logical volumes. Logical volumes correspond to partitions: they hold a filesystem. Unlike partitions though, logical volumes get names rather than numbers, they can span across multiple disks, and do not have to be physically contiguous.
The Specifics
One of the biggest advantages LVM has is that most operations can be done on the fly, while the system is running. Most operations that you can do with gparted require that the partitions you are trying to manipulate are not in use at the time, so you have to boot from the livecd to perform them. You also often run into the limits of the msdos partition table format with gparted, including only 4 primary partitions, and all logical partitions must be contained within one contiguous extended partition.
Resizing Partitions
With gparted you can expand and shrink partitions, but only if they are not in use. LVM can expand a partition while it is mounted, if the filesystem used on it also supports that ( like the usual ext3/4 ). When expanding a partition, gparted can only expand it into adjacent free space, but LVM can use free space anywhere in the Volume Group, even on another disk. When using gparted, this restriction often means that you must move other partitions around to make space to expand one, which is a very time consuming process that can result in massive data loss if it fails or is interrupted ( power loss ).
Moving Partitions
Moving partitions with gparted is usually only necessary in the first place because of the requirement that partitions be physically contiguous, so you probably won’t ever need to do this with LVM. If you do, unlike gparted, LVM can move a partition while it is in use, and will not corrupt your data if it is interrupted. In the event that your system crashes or loses power during the move, you can simply restart it after rebooting and it will finish normally. When I got my SSD drive, I simply plugged it in, booted it up, and asked lvm to move my running root filesystem to the new drive in the background while I continued working. Another reason you might want to move is to replace an old disk with a new, larger one. You can migrate the system to the new disk while using it, and then remove the old one later.
Many Partitions
If you like to test various Linux distributions, or just different version of Ubuntu, or both, you can quickly end up with quite a few partitions. With conventional msdos partitions, this becomes problematic due to its limitations. With LVM you can create as many Logical Volumes as you wish, and it is usually quite easy since you usually have plenty of free space left. Usually people allocate the entire drive to one partition when they first install, but since extending a partition is so easy with LVM, there is no reason to do this. It is better to allocate only what you think you will need, and leave the rest of the space free for future use. If you end up running out of the initial allocation, adding more space to that volume is just one command that completes immediately while the system is running normally.
Snapshots
This is something you simply can not do without LVM. It allows you to freeze an existing Logical Volume in time, at any moment, even while the system is running. You can continue to use the original volume normally, but the snapshot volume appears to be an image of the original, frozen in time at the moment you created it. You can use this to get a consistent filesystem image to back up, without shutting down the system. You can also use it to save the state of the system, so that you can later return to that state if you mess things up. You can even mount the snapshot volume and make changes to it, without affecting the original.
Lets start
First check the partition available on our server
fdisk -l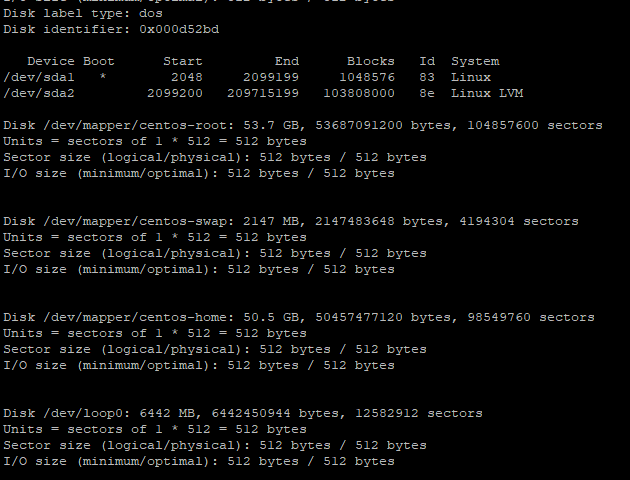
As we can see we have partition table created for sda as sad1 and sda2. sdb is a new drive and no partitions have been created for it. Lets check what partition table is used to create lvm drive
lsblk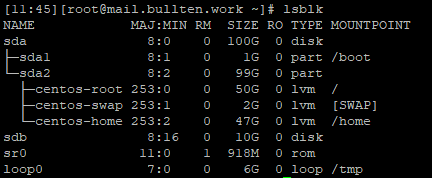
We can see sda2 is used to create 3 lvm drive centos-root, centos-swap and centos-home and sdb is new empty drive.
Lets create a partition for sdb drive
fdisk /dev/sdb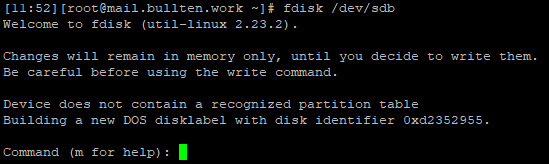
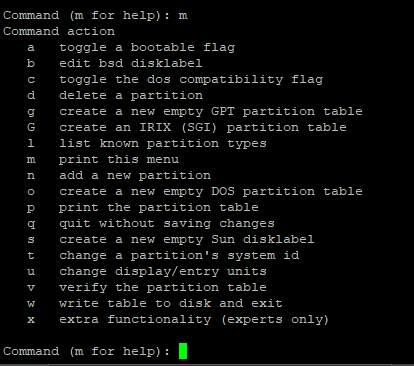
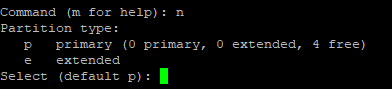
Now press m to list all options.
Press n to create a new partition table.
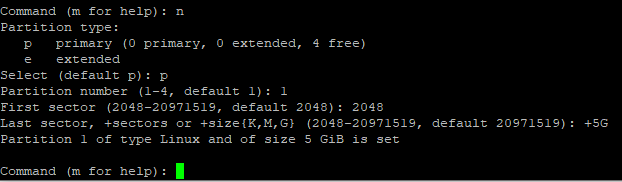
Choose partition type as p and partition number to 1. Select first sector as default 2048 and last sector as +5G. I have used 5G because I want to add only 5G from my current 10G sdb to LVM.
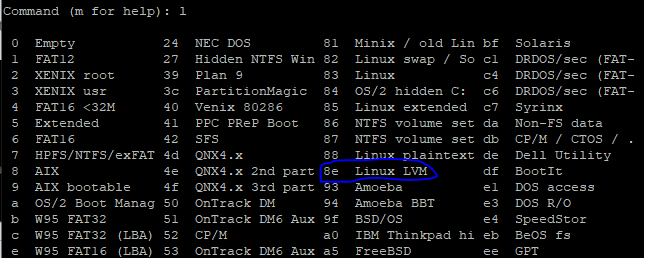
Now press l to see all partition types. We have to search for linux LVM and see its partition code as it is 8e.
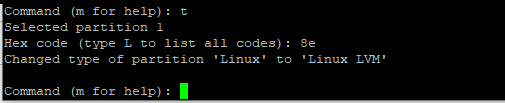
Now press t and enter your partition code 8e
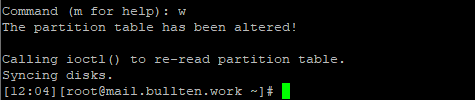
Now press w to write changes
Now run fdisk -l and you will see your partition created with LVM system.
Lets add newly created partition in lvm. First run pvdisplay and check the displayed information. In my case /dev/sda2 is added and volume group name is centos. We will add /dev/sdb1 to it.
[12:07][[email protected] ~]# pvdisplay
  --- Physical volume ---
  PV Name               /dev/sda2
  VG Name               centos
  PV Size               <99.00 GiB / not usable 3.00 MiB
  Allocatable           yes
  PE Size               4.00 MiB
  Total PE              25343
  Free PE               1
  Allocated PE          25342
  PV UUID               YdQIfT-nkCu-In0Z-JnFj-AEs3-anJs-plMXYP
pvcreate /dev/sdb1[12:08][[email protected] ~]# pvcreate /dev/sdb1
Physical volume "/dev/sdb1" successfully created.You can see above we have added sdb1 and it shows successfully added. Lets run pvdisplay again to check. We can see /dev/sdb1 is newly added physical volume with PV size of 5G.
[12:09][[email protected] ~]# pvdisplay
  --- Physical volume ---
  PV Name               /dev/sda2
  VG Name               centos
  PV Size               <99.00 GiB / not usable 3.00 MiB
  Allocatable           yes
  PE Size               4.00 MiB
  Total PE              25343
  Free PE               1
  Allocated PE          25342
  PV UUID               YdQIfT-nkCu-In0Z-JnFj-AEs3-anJs-plMXYP

  "/dev/sdb1" is a new physical volume of "5.00 GiB"
  --- NEW Physical volume ---
  PV Name               /dev/sdb1
  VG Name
  PV Size               5.00 GiB
  Allocatable           NO
  PE Size               0
  Total PE              0
  Free PE               0
  Allocated PE          0
  PV UUID               X8gF3K-tMKx-EINI-Vbx5-ZT8B-dYQ0-kBGGIA
Now we will check volume group information using vgdisplay.
vgdisplay[12:10][[email protected] ~]# vgdisplay
--- Volume group ---
VG Name centos
System ID
Format lvm2
Metadata Areas 1
Metadata Sequence No 4
VG Access read/write
VG Status resizable
MAX LV 0
Cur LV 3
Open LV 3
Max PV 0
Cur PV 1
Act PV 1
VG Size <99.00 GiB
PE Size 4.00 MiB
Total PE 25343
Alloc PE / Size 25342 / 98.99 GiB
Free PE / Size 1 / 4.00 MiB
VG UUID CwAUQa-3WWe-f8J3-Rhzy-qgSu-Sz8s-sbUtOM
Here we will not create a new volume we will just extend previously created volume group named centos using vgextend
vgextend centos /dev/sdb1[12:14][[email protected] ~]# vgextend centos /dev/sdb1
Volume group "centos" successfully extendedNow lets run vgdisplay again to check if sdb1 is added to it. You can see now we have 5.00 GiB of Free PE / Size.
[12:14][[email protected] ~]# vgdisplay
  --- Volume group ---
  VG Name               centos
  System ID
  Format                lvm2
  Metadata Areas        2
  Metadata Sequence No  5
  VG Access             read/write
  VG Status             resizable
  MAX LV                0
  Cur LV                3
  Open LV               3
  Max PV                0
  Cur PV                2
  Act PV                2
  VG Size               103.99 GiB
  PE Size               4.00 MiB
  Total PE              26622
  Alloc PE / Size       25342 / 98.99 GiB
  Free  PE / Size       1280 / 5.00 GiB
  VG UUID               CwAUQa-3WWe-f8J3-Rhzy-qgSu-Sz8s-sbUtOM
Lets now check the logical volumes we have . We have 3 LV /dev/centos/swap, /dev/centos/home, /dev/centos/root. We will be extending /dev/centos/home whose size is 46.99 GiB.
lvdisplay[12:16][[email protected] ~]# lvdisplay
--- Logical volume ---
LV Path /dev/centos/swap
LV Name swap
VG Name centos
LV UUID QDO0Es-hJnI-7xIL-kbdS-bPnw-LJ7s-C7KWdf
LV Write Access read/write
LV Creation host, time localhost, 2020-04-10 00:53:46 +0000
LV Status available
# open 2
LV Size 2.00 GiB
Current LE 512
Segments 1
Allocation inherit
Read ahead sectors auto
- currently set to 8192
Block device 253:1
--- Logical volume ---
LV Path /dev/centos/home
LV Name home
VG Name centos
LV UUID JVQgoI-hjzE-Ejyy-aBEN-erZR-pdiQ-jKUa4P
LV Write Access read/write
LV Creation host, time localhost, 2020-04-10 00:53:47 +0000
LV Status available
# open 1
LV Size 46.99 GiB
Current LE 12030
Segments 1
Allocation inherit
Read ahead sectors auto
- currently set to 8192
Block device 253:2
--- Logical volume ---
LV Path /dev/centos/root
LV Name root
VG Name centos
LV UUID G0UXiw-Z106-H3o1-UIX9-S2FE-CmFj-xFfP5h
LV Write Access read/write
LV Creation host, time localhost, 2020-04-10 00:53:47 +0000
LV Status available
# open 1
LV Size 50.00 GiB
Current LE 12800
Segments 1
Allocation inherit
Read ahead sectors auto
- currently set to 8192
Block device 253:0In the below example we extending /dev/centos/home to 1G.
lvextend -L+1G /dev/centos/home[12:17][[email protected] ~]# lvextend -L+1G /dev/centos/home
Size of logical volume centos/home changed from 46.99 GiB (12030 extents) to 47.99 GiB (12286 extents).
Logical volume centos/home successfully resized.Now the last part is to resizing the volume. For xfs file systemd use below command
xfs_growfs /dev/centos/home[12:26][[email protected] ~]# xfs_growfs /dev/centos/home
meta-data=/dev/mapper/centos-home isize=512 agcount=4, agsize=3079680 blks
= sectsz=512 attr=2, projid32bit=1
= crc=1 finobt=0 spinodes=0
data = bsize=4096 blocks=12318720, imaxpct=25
= sunit=0 swidth=0 blks
naming =version 2 bsize=4096 ascii-ci=0 ftype=1
log =internal bsize=4096 blocks=6015, version=2
= sectsz=512 sunit=0 blks, lazy-count=1
realtime =none extsz=4096 blocks=0, rtextents=0
data blocks changed from 12318720 to 12580864If you have ext4 filesystem use the below command
resize2fs /dev/centos/home