
Zammad is a web based open source helpdesk/customer support system with many features to manage customer communication via several channels like telephone, facebook, twitter, chat and emails. It is distributed under version 3 of the GNU AFFERO General Public License (GNU AGPLv3).
Features
Easy data historization
Zammad is auditable. That’s the reason it is often used in banks. Via the ticket history it’s possible to reconstruct at any time who changed which attribute to which value.
Individual fields
With Zammad you can easily create individual fields like a desired deadline. And here’s the kicker: It doesn’t only work for tickets, but also for clients and organizations.
Your own overview
Create individual overviews – especially for your different teams. The admin is able to define numbers, names, columns, attributes and authorizations.
Phone
The Zammad API helps you to integrate your telephone system into in- and outgoing calls. Clients are picked and shown via their telephone number and outgoing calls can be initialized by click.
Branding
Individual guys need individual styles. That’s why clients and agents are able to change the look of Zammad according to their wishes and give the user interface their own personality.
Autosave
No need to be scared of closing without saving. The current progress is being saved automatically and work can be continued on other devices.
Permanent marking
You wish to mark important sections for the whole team? Zammad supports the permanent marking of important sections in order to provide indication for your colleagues.
Security
Play it safe with Zammad: We support different guidelines for keywords, device-logging and two-factor-authentication.
Customer interface
Customers are able to track the current editing at any time via the customer interface and can provide further information easily.
External authentication
Zammad is up to date. It’s possible to log in via Twitter, Facebook, LinkedIn or Google via OAuth.
Escalations
Would you like to ensure your clients an individual escalation or solution time limit? Zammad will help you to adhere to your agreements and their evaluation
Immediate changes
The change of objects is reported immediately in the application. The advantage? Double editing is impossible and your colleagues are always provided with the newest information.
Chat
It’s worth to be quick: Customer requests can be solved seven times faster via our chat than via email.
Multilingual
The Zammad Web-App supports nine languages. You only have to choose the preferred language for your user interface.
Tasks
Zammad supports multitasking: Your agents are up to open and edit several documents (tickets, user, organization) at once without switching between browser windows.
Text modules
Zammad is comfortable: With the aid of our flexible text modules, customer requests can be solved more efficiently.
Full-text search
Looking for the needle in a haystack? No problem with Zammad. Our full-text search doesn’t only browse tickets but also their attachments. And this with full power: The search within 40 GB of data for example takes only up to three seconds.
Twitter integration
The world’s talking about you? We guarantee your attention. You can answer immediately via status updates or message.
VIP
Zammad shows you who’s important. Via the VIP-feature important clients can be “marked” and will be presented marked in the interface.
Zammad migrator
Moving without missing data? It’s easy: By moving to Zammad you can migrate your previous data straightforwardly. Use the Zammad migrator and migrate from OTRS or Zendesk to Zammad.
How to Install Zammad on CMM
Find and save your MySQL root password somewhere as we will need that later.
cat /root/.my.cnf | grep password | cut -d' ' -f1 | cut -d'=' -f2Output
[10:45][[email protected] ~]# cat /root/.my.cnf | grep password | cut -d' ' -f1 | cut -d'=' -f2
YLglCR37twsDr0qTArFoHhwWI
Create vHost for a domain name by choosing option 2 in centmin.sh gui
cmdir
./centmin.sh
Install Ruby 2.7
yum install curl gpg gcc gcc-c++ make imlib2 imlib2-devel -y
curl -sSL https://rvm.io/mpapis.asc | sudo gpg2 --import -
curl -sSL https://rvm.io/pkuczynski.asc | sudo gpg2 --import -
curl -sSL https://get.rvm.io | sudo bash -s stable
usermod -a -G rvm `whoami`
source /etc/profile.d/rvm.sh
rvm requirements
rvm install 2.5.5
rvm use 2.5.5 --default
Install Zammad
useradd zammad -m -d /opt/zammad -s /bin/bash
sudo usermod -a -G rvm zammad
cd /opt
wget https://ftp.zammad.com/zammad-latest.tar.gz
tar -xzf zammad-latest.tar.gz -C zammad
chown -R zammad:zammad zammad
su - zammad
gem install bundler
bundle install --without test development postgres
Configure Datatabse
cp config/database/database.yml config/database.ymlEdit MySQL Database. Uncomment #### mysql config ##### part and add your MySQL root login
vi config/database.ymlFind
#### mysql config #####

# adapter: mysql2
# username: zammad
# password: <password>
Change to
#### mysql config #####

adapter: mysql2
username: root
password: YLglCR37twsDr0qTArFoHhwWI
Initialize your database
export RAILS_ENV=production
export RAILS_SERVE_STATIC_FILES=true
rake db:create
rake db:migrate
rake db:seed
rake assets:precompile
Change to Root and setup Zammad Services
su - root
cd /opt/zammad/script/systemd
./install-zammad-systemd-services.sh
systemctl enable zammad
Now we have Zammad running on port 3000
Lets setup Nginx Vhost to run zammad on domain name. Replace site.bullten.work with your domain dame you created above
vi /usr/local/nginx/conf/conf.d/site.bullten.work.ssl.confFind
root /home/nginx/domains/site.bullten.work/public;Change to
root /opt/zammad/public;Find
location / {
include /usr/local/nginx/conf/503include-only.conf;
# block common exploits, sql injections etc
#include /usr/local/nginx/conf/block.conf;
# Enables directory listings when index file not found
#autoindex on;
# Shows file listing times as local time
#autoindex_localtime on;
# WordPress Permalinks example
#try_files $uri $uri/ /index.php?q=$uri&$args;
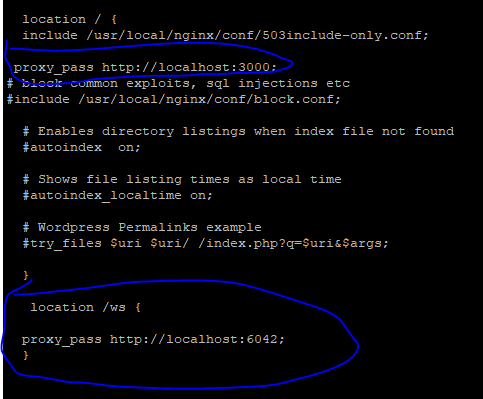
}Add Under {}. We have added proxy_pass http://localhost:3000; below include directive.
  location / {
  include /usr/local/nginx/conf/503include-only.conf;

 proxy_pass http://localhost:3000;

  # block common exploits, sql injections etc
  #include /usr/local/nginx/conf/block.conf;

  # Enables directory listings when index file not found
  #autoindex  on;

  # Shows file listing times as local time
  #autoindex_localtime on;

  # WordPress Permalinks example
  #try_files $uri $uri/ /index.php?q=$uri&$args;

  }
Find
include /usr/local/nginx/conf/pre-staticfiles-local-site.bullten.work.conf;Add Above
location /ws {
proxy_pass http://localhost:6042;
}
So all this should look like the below screenshot
Restart Nginx
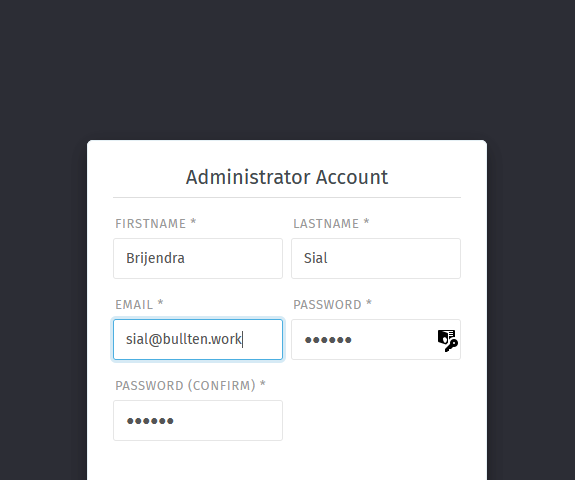
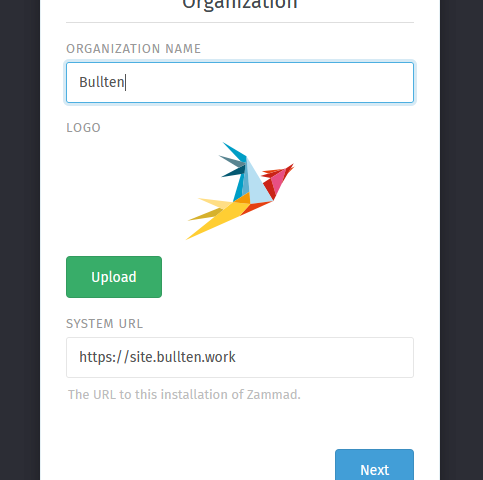
nprestartNow open your domain name in web browser and you will see zammad setup screen as below
Additionally you can install ElasticSearch and configure it to work with zammad.
Install ElasticSearch
rpm --import https://artifacts.elastic.co/GPG-KEY-elasticsearch
echo "[elasticsearch]
name=Elasticsearch repository for 7.x packages
baseurl=https://artifacts.elastic.co/packages/7.x/yum
gpgcheck=1
gpgkey=https://artifacts.elastic.co/GPG-KEY-elasticsearch
enabled=1
autorefresh=1
type=rpm-md"| sudo tee /etc/yum.repos.d/elasticsearch.repo
yum install -y java-11-openjdk java-11-openjdk-devel elasticsearch
sudo /usr/share/elasticsearch/bin/elasticsearch-plugin install ingest-attachment
Centos 7
systemctl start elasticsearch.service
systemctl enable elasticsearch.service